Lots of Dots!

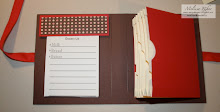
Do you like dots? Who doesn't?? I was in a "dotty" mood this afternoon when I made this criss cross card. (Find the tutorial here.)


I had not tried one of these cards before and it was pretty easy and nice to have something a little different. I used Rich Razzleberry as my base and the Cottage Wall Designer Series Papers to decorate. My insert is Orchird Opulence and Whisper White Cardstock. The image and sentiment are from the awesome Hostess Set The More the Merrier.


I used Rich Razzleberry Polka Dot Grosgrain Ribbon and Old Olive Buttons from the Playground Designer Buttons. (Hint: Mini Glue Dots are a must have for attaching embellishments such as buttons to your creations.)


Overall I think the card came together quite nicely! What do you think? Do you ever yearn to step outside the box with your cards?

Here's what I used:

Stamps
The More the Merrier 115322 (Hostess Level 3)

Ink
Basic Black 101179
Old Olive 102277
Rich Razzleberry 115658
Ruby Red 102259

Paper
Whisper White 100730
Orchid Opulence 100969
Rich Razzleberry 115316
Cottage Wall Designer Series Paper 115671

Etc
Rich Razzleberry Polka Dot Grosgrain Ribbon 115613
Playground Designer Series Buttons 116313
Blender Pens 102845
Mini Glue Dots 103683
Crop-A-Dile 108362
3/16" Corner Rounder Punch 109047

Cute as a Bug!

Looking for a cute set for the children in your life? (and maybe the grown-ups too!) Look no further than this cutey-patootey set "Bugs and Kisses!"


I love the way this little card turned out! I started by stamping my grasshopper, snail, and caterpillar in Crushed Curry, Old Olive, and Ruby Red on Whisper White Cardstock. My sentiment was also stamped in Ruby Red. I cut out my images and matted themon matching cardstock. A Playground Designer Button was added to my sentiment. (Hint: a sliver of Ruby Red Cardstock makes the perfect "thread" for my button!)


I didn't have the perfect patterned background so as usual, I decided to make my own using one of the small circle stamps from the Delightful Decorations set I previewed on Firday (available September 1st in the new Holiday Mini!) Don't have a Mini? Click the Contact Me button on the left and I'll send you one!

My patterned paper was mounted on Old Olive and a Whisper White card base and I added my bugs with Stampin' Dimensionals.


As a little extra touch I stamped these adorable tiny bugs inside!

Here's what you need:

Stamps

Bugs and Kisses 116580
Delightful Decorations 116517

Ink
Crushed Curry 115659
Old Olive 102277
Ruby Red 102259

Paper
Whisper White 100730
Crushed Curry 115319
Old Olive 100702
Ruby Red 102030

Etc
Designer Playground Buttons 116313
Stampin' Dimensionals 104430

Don't forget, tomorrow is the last day to sign up with the current starter kit deals, see this post for more details on how you can sign up and my current new Demonstrator specials!

Day Off!

Taking the day off posting today to spend time with my wonderful husband and gorgeous little boys! Have a wonderful Saturday!

Holiday Mini Sneak Peek!!


Just as I promised yesterday, here is a Sneak Peek at what I think is the Must Have Set of the Holiday Mini Catalog, Delightful Decorations! This awesome set features four different ornaments as well as three small decorations perfectly sized to be punched out with a 3/4" circle punch. And what's that? You don't want to cut out all those ornaments? Never you fear, as there is a coordinating punch! How cool is that?


This card with matching gift tags were a super easy project. My card started with a Chocolate Chip card Base, topped with Old Olive and Merry Moments Designer Series Paper. I then punched out three ornaments in Old Olive and Real Red and popped them up with dimensionals on top of some twine and I was finished! (Hint: Chocolate Chip, Old Olive, and Real Red are the go-to colors for this Holiday Season!)

My ornaments were simply punched out, then I added a hole with my Mat Pack and Piercing Tool and tied with twine. Voila! Perfect pre-holiday gift!

So tell me, what do you think of this new set? Is it on your Must-Have list too?

What I used:

Stamps
Delightful Decorations 116517 (available September 1)

Paper
Chocolate Chip 102128
Old Olive 100702
Whisper White 100730
Merry Moments Designer Series Paper 115672

Ink
Chocolate Chip Classic Stampin' Pad 100908
Old Olive Classic Stampin' Pad 102277
Real Red Classic Stampin' Pad 103133

Etc
Ornament Punch 116794 (available September 1)
Stampin' Dimensionals 104430
Twine-my own supply
Paper Piercing Tool 116631
Mat Pack 105826
 

120 Days until Christmas!

Well, we have roughly four months until Christmas and this year will be the first I'm going to make all of my Christmas cards by hand. What about you? Will you brave the inky fingers, embossing powder dust storms, and perils of dimensionals to join me?

Here is the first in what promises to be many posts featuring my holiday ideas. As you may well know, I'm a big fan of the Clean and Simple look and I think this Card and Accessory kit just screams (nicely, of course) simple elegance.


Lets start first with the card. This card was made with a Bashful Blue base topped with Night of Navy. My snowflakes were stamped onto a piece of Bashful Blue and my tree was stamped on Night of Navy, both with Versamark. (All of these stamps are from the Snow Swirled set on page 36 of the new Idea Book and Catalog.) I then used White Stampin' Emboss powder to make the images pop. (Hint: Versamark a can be used to heat emboss as it remains sticky for some time to give you a chance to add your embossing powder, or if you just let it dry alone it makes a lovely watermark look.)


My tree was mounted on Bashful Blue then Whisper White and mounted over the Embossed snowflakes at an angle. That's all there was to it.


To compliment my card I created some matching gift tags and bag toppers. The Gift tags are simply the medium sized snowflake from Snow Swirled heat embossed with White Stampin' Emboss powder on Night of Navy and punch out with my 1 3/8" circle punch. I then used my Paper Piercer and Mat Pack to pierce a hole in the top of each and tied a loop of thread through the hole.


To make my bag toppers I used my Big Shot to cut out the oh-so-versatile Top Note Die in Night of Navy once again. Then, you guess it, I used my sentiment and small snowflake from Snow Swirled and heat embossed in White Stampin' Emboss powder once again. **What's that in those pretty bags? Stay tuned tomorrow for some Sneak Peeks from the New Holiday Mini Catalog out September 1st!**


It would be too easy to whip out this lovely coordinating set of cards, tags, and bag toppers for all your friends and family this season and really "Wow" them!


Here's what I used:

Stamps
Snow Swirled 111690

Ink
Versamark Pad 102283

Paper
Night of Navy 100867
Bashful Blue 105120
Whisper White 100730

Etc
Stampin' Emboss Powder White 109132
1 3.8" Circle Punch 104401
Paper Piercing Tool 116631
Mat Pack 105826
Big Shot Die Cutting Machine 113439
Stampin' Up! Top Note Bigz Die 113463
Heat Tool 100005

I don't know about you, but I think these cards are sure to impress...best of all you can make these cards for less than $1.50 each, which is comparable to store-bought boxes of cards but oh-so-much more special. Click my "Shop Now' button on the left to go right to my Stampin' Up! website to order online anytime, or click "Contact Me" on my left sidebar to email me with your order or any questions you might have.

Oh! And don't forget! The Mini Starter Kit Special ends August 31st! Don't miss your chance to take advantage of this awesome deal and join me in becoming a Stampin' Up! Independent Demonstrator. More details here.

Mojo Monday


This week's Mojo Monday sketch challenge was the perfect opportunity for me to break out my brand spankin' new Medallion stamp. Believe it or not, this is actually my first background stamp; but this beauty definitely doesn't fade into the background!


My card base is Chocolate Chip scored at the top. I layered this with Bordering Blue that I ran through my Big Shot with the Damask Texturz Plate. I then attached my 1 1/4" Chocolate Chip Striped Ribbon. My Medallion was stamped in Chocolate Chip on Whisper White Cardstock and I added a Filigree Designer Brad to add a "pop." This was layered on Chocolate Chip and added to my card with Stampin' Dimensionals to finish it off!

Here's what you need:

Stamps
Medallion Background Stamp 115223

Ink
Chocolate Chip 100908

Paper
Bordering Blue 102630
Chocolate Chip 102128
Whisper White 100730

Etc
Filigree Designer Brads 112577
1 1/4" Striped Grosgrain Ribbon 115617
Stampin' Dimensionals 104430

On Dasher!

I love this little Dasher stamp from the New Catalog and Idea Book, he can be foundon the last page of the catalog for only $8.95! When I first saw this stamp I knew it would be mine, the possiblities are endless....


Mr. Brown delivered my package of new Stampin' Up goodies quite late in the day (which isn't the most relaxed time with 1 and 2.5 year old little boys!) so I didn't have so much time to play yesterday. I whipped up this little beauty in just about 10 minutes though! My card base is Chocolate chip, to this I added a layer of Old Olive. A gorgeous Chocolate Chip striped ribbon makes a statement on the left side of the card while my "deer" friend Dasher (haha-early morning humor!) graces the right side of the card stamped and matted on Chocolate Chip. My sentiment from Snow Swirled and stamped in Chocolate Chip in the lower right corner.


Because I used a Chocolate Chip card base I added a Whisper White Top Note to the interior of the card. On this I stamped another sentiment from Snow Swirled in Chocolate Chip. Voila! Finished! A simple and stunning Christmas Card!


So what is your favorite holiday stamp from the new Idea Book and Catalog?

Here's what you need for this card:

Stamps
Dasher 116816
Snow Swirled 111690

Ink
Chocolate Chip 100908

Paper
Whisper White 100730
Chocolate Chip 102128
Old Olive 100702

Etc
Chocolate Chip 1 1/4" Striped Grosgrain Ribbon 115617
Stampin' Dimensionals 104430
Stamp-a-ma-jig 101049
Big Shot Die Cut Machine 113439
Stampin' Up! Top Note Bigz Die 113463

Clean and Simple

I definitely think this card qualifies as a CAS or "Clean and Simple" design. I was on the fence as to whether it needed more but in the end I decided it was perfect just the way it is.


My images from Herb Expressions were stamped in Bermuda Bay on Whisper White cardstock. This is truly one of my favorite stamp sets ever, it was the first one in the new catalog that I just had to have! (Hint: I removed the words from the Thyme stamp by inking up the stamp and then covering the "Thyme (happiness)" area with scotch tape.) My image and sentiment were then matted on Bermuda Bay and positioned on my card base (The sentiment is "popped" with Stampin' Dimensionals).

The card base is 4.25 by 5.5" Whisper White scored at the top (I know-I'm a rebel!) My Bermuda Bay layer is 4 1/8 by 5 3/8" as I wanted the layers to be very thin. This was covered with a 4 by 5.25" piece of Whisper White cardstock I had run through my Big Shot with the Small Dots Texturz Background 1 plate. A Bermuda Bay Polka Dot Grosgrain ribbon finished everything off.


So, be honest...is it too simple? I'd love feedback!

And stay tuned all week because my box of new Stampin' Up! goodies should arrive today full of Mini Catalog Sneak Peeks and some new faves from the Idea Book and Catalog!

Here's what you need:

Stamps
Herb Expressions 113224

Paper
Whisper White 100730
Bermuda Bay 115317

Ink
Bermuda Bay 115655

Etc.
Bermuda Bay Polka Dot Grosgrain Ribbon 115610
Stampin' Dimensionals 104430
Big Shot Die Cut Machine 113439
Texturz Plates Backgrounds 1 114512

Blog Candy Winner!

Congratulations Sharon! Random.com picked comment number 17 for my Blog Candy Winner! Here's the winning comment:

Little GTO said...
What a super start for you! Lovely blog candy. I've been drooling over the buttons for some time now. Think I should sell my blood? LOL!
Sharon L
sharon.lemon@sbcglobal.net

August 17, 2009 12:38 PM

Thanks so much to everyone who left a comment, and please check back as I'll be posting more blog candy soon!

A CASE of Inspiration

As I said yesterday, I have been lacking in Mojo in a big way....so what better to do than stroll through Splitcoast Stampers to find some inspiration! I found the perfect inspiration here on Paige Lynd's blog. Here is my interpretation:


My bird image is from the Of the Earth Hostess Set. I love this set and it is a Level 1 set so its super easy to get for FREE by either placing an order over $150 or hostessing a workshop with totals over $150. (You'll also get Free mercahndise!) Click the contact me link to the left or Shop Now button to get your set now!

I stamped my bird image three times, once each in Pumpkin Pie, Dusty Durango, and Crushed Curry. This was mounted on Pumpkin Pie. My card base is Whisper White cardstock with Pumpkin Pie and Crushed Curry layered on top. The patterned paper is from the ultra-versatile Razzleberry Lemonade Designer Series Paper. I tied a Dusty Durango Polka Dot Grosgrain Ribbon across my patterned paper and finished it off with a sentiment from Teeny Tiny Wishes in Dusty Durango.

Just a reminder that Stampin' Up has an awesome Mini Starter Kit offer now through the end of the month. You can get a New Demonstrator Starter Kit for only $85! Click here for all the details and my special offer if you sign up this month!

Tune in tomorrow for the winner of the Blog Candy!!!

What you need to make this card:

Stamps
Of the Earth Hostess Set 115336

Paper
Whisper White 100730
Crushed Curry 115319
Pumpkin Pie 105117
Razzleberry Lemonade 115675

Ink
Dusty Durango 115654
Crushed Curry 115659
Pumpkin Pie 105216

Etc
Stamp-a-ma-jig 101049
Dusty Durango Polka Dot Grosgrain Ribbon 115609

Second String

I am facing a creative dilemma, and I'm sure you can all sympathize. I placed a sizeable order earlier this week that will arrive Monday and now I don't want to play with any of my old friends. I'm a fickle stamper who goes through phases, I admit it. So today I have no mojo. (Sleep training my 14 month old isn't exactly getting those creative juices flowing either!) But I didn't want to leave you with nothing today so here are a few projects I had laying around that hadn't made the cut earlier in the week. I hope you'll forgive me and come back tomorrow when I promise to have created something fab! Oh, and don't forget to enter for my blog candy if you haven't already, winner will be drawn Sunday!!!


Easy 3D Project

Here is an easy, fast, and fun 3D project that makes a great small gift. I found this small composition book at Walmart in the office section for less than a dollar. I'm not usually a 3D project kindof girl but wanted to force myself out of my comfort zone and this little book just screamed "Give me some Pizazz!" I took pity on it and brought it home to my Saucy Stampin' Project Zone (aka my craft table in the kitchen!!).


I measured my little book and cut some happy Razzleberry Lemonade Designer Series Paper a half inch larger on all sides. Using Sticky Strip placed on the edge of the notebook's cover (so it was folded over the edge with some on both the inside and outside of the cover) I attached my paper to the book. I trimmed the ends on the top and bottom so it just barely overlaps the top and bottom of the book cover. I then again used Sticky Strip to attach my ribbon. Originally the ribbon was just to be decoration but then I realised it would make a good page marker so I left a long end you can use as a bookmark.


I took the small flower from Bella's Bloom and stamped it in Crushed Curry and Dusty Durango on Whisper White Cardstock to make a background design. I then inked up only the "Happy" from the Teeny Tiny Wishes "Happy New Year" stamp and stamped it in Dusty Durango and snipped it out with Paper Snips. Dusty Durango mats completed the look and it was attached to my cover. (I really wanted to attach it with Stampin' Dimensionals but I plan on keeping this little beauty in my purse for notes and figured the dimensionals would make it catch on other things.)


Like I said, I'm not usually a 3D project kindof girl so if you liked this and want to see more of this type of thing, leave me a comment! And don't forget to scroll down and enter for my blog candy, the winner will be drawn on Sunday! And check out my specials on the sidebar!

Just For You

As you may have noticed, I prefer cards with a clean, modern look and today's card is no exception.


My main image is from the Hostess Set Of the Earth. (Click the Contact Me button to the left to learn how you can earn this stamp set FREE by hostessing a Stampin' Up! workshop in the Kansas City area or click SHOP NOW and place an order for $150 or more at my Online Store and earn it FREE!)

I stamped my flower in Dusty Durango and Pumpkin Pie on Whisper White cardstock. (Hint: Tone on tone stamping is an easy way to achieve a modern look in your cards.) I mounted my image on Dusty Durango cardstock.

My card base uses Whisper White, Dusty Durango, and Blush Blossom cardstock. I tied my Dusty Durango Polka Dot Grosgrain Ribbon using the Stay Put Bow technique (See my video tutorial here). Two Jumbo Brads were placed in the upper left corner using a Paper Piercing Tool and Mat Pack for perfect placement.

The sentiment is from the Teeny Tiny Wishes set, a must-have with 24 different sentiments for every occasion. I placed my "Just for You" just right using my handy dandy Stamp-a-ma-jig. The final step was to place my image on the base and I was done! An easy five minute card with lots of style!

Here's what you need:

Stamps
Teeny Tiny Wishes 115370
Of the Earth Hostess Level 1 115336

Ink
Dusty Durango 115654
Pumpkin Pie 105216

Paper
Dusty Durango 115321
Whisper White 100730
Blush Blossom 103318

Etc
Dusty Durango Polka Dot Grosgrain Ribbon 105609
5/18" Neutral Jumbo Brads 112534
Paper Piercing Tool 116631
Mat Pack 105826
Stamp-a-ma-jig 101049

Pop Up Slider with Tutorial

Before I start what promises to be a Looooooong post, let me remind you to check out yesterday's blog candy post and leave me a message to be entered. Winner will be chosen randomly this Sunday!


Okay....many of you wanted more tutorials, so ladies: lets get started! Today I'd like to share a Pop Up Slider Card.


Before you begin take a moment to prepare your supplies, you will need the following:


(2) 4.25 by 5.5 inch pieces of cardstock, one for the front and one for the back (I used So Saffron for my card front and Whisper White for the card back)

A 3 by 4.25" piece of cardstock for your slider, I used Bermuda Bay

Cardstock for your main image, I used 2 by 2.5" Whisper White and 2.25 by 2.75 Bermuda Bay

A thin strip of regular typing paper, about a half inch wide and 8 inches long

Scissors

Paper cutter

Bone folder

Craft knife

Ruler

Adhesive

Hole Punch

Circle Punch (I used 1 3/8")

Ribbon

Stamps, Ink, and any other embellishments you'd like to decorate with

Okay, here we go! First thing, stamp or decorate your front piece of cardstock. I stamped an image from Pocket Silouhettes in Crushed Curry on my So Saffron cardstock to give a tone on tone look.


Then, using your ruler and craft knife, you're going to measure in 3/4" from each side and cut your cardstock starting and stopping with a 3/4" border. I other words, measure in 3/4" and cut from the 3/4" mark to the 4 3/4" mark. Repeat at the 3.5 inch mark. Then, on the BOTTOM of your cardstock, connect the two cuts to you have cut a flap on your cardstock opening at the bottom.
 

Next, turn your card on its side with the cut end of the flap to your left and score from cut to cut at the 1.5" mark, 3" mark, and 4 3/4" mark.
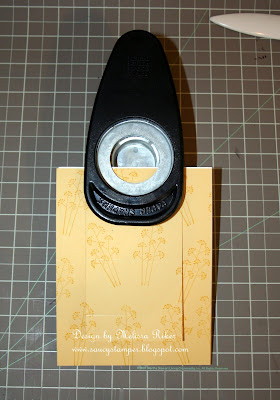


 Okay, the hardest part (at least for me to clearly explain!) is over...its all downhill from here! The next step is to take your front and back pieces, line them up and punch about a quarter to a third way up with your circle punch to allow for your pull tab to be seen.
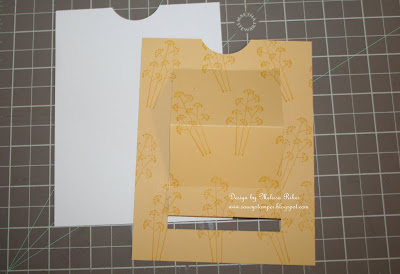
 See how it's all coming together?
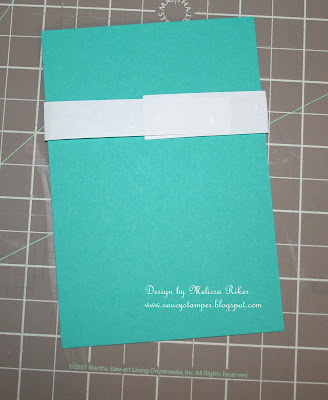
 Then take your strip of copy paper and loosely loop it around your tab and tape it.
Remove the loop and adhere it to the BACK of your front piece of cardstock just under your circle punch and above your flap. (Make sure its the BACK of the front peice of cardstock....mine shows the stamped design because the first time I cut my flap I accidentally cut it at the top instead of the bottom so had to decorate the other side in the right position!)
 
Using your Stampin' Up Corner Rounder Punch round the top corners of your slider piece. You can also use scissors to create a tab.
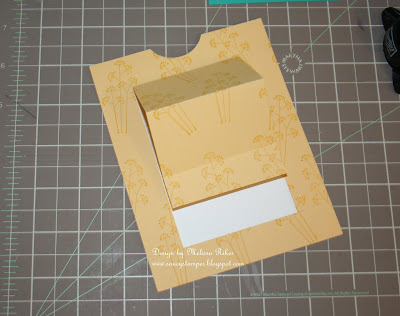
  Fold your flap along the score lines.
 
Insert your slider through the loop you made and slide it all the way down so the top is level with the front and back pieces. Use Snail or Sticky Strip to glue the end of your flap to the bottom of the Slider. Then, using Sticky Strip or your Snail, adhere your front and back cardstock peices together. (Do not use any adhesive along the top of your card as this is where the slider will be.)
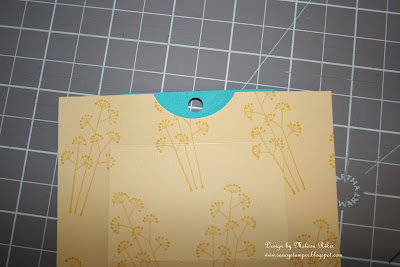
 Punch a hole in the top center of your Slider.
 
Create your main image. I used Pocket Silhouettes in Bermuda Bay.
 
Adhere your main image to your flap, positioning it just above the first fold. Only the bottom half of your stamped image will be adhered. When the flap is folded, you want the top to stick up. Then you can stamp or write on the inside of the card. I used a sentiment from Herb Expressions for my "Thanks" sentiment on the front of the card and the sentiment on the inside. (Hint: I inked up just the Thanks portion and used scotch tape over the rest to isolate part of the sentiment. You could also color just the portion you wanted with your Stampin' Write marker.)Tie your ribbon to the top of your slider and pat yourself on the back-you did it!


That's it! You're all finished! Here is your card!


Blog Candy Time!!

To celebrate my first week on my new blog as well as surpassing 500 hits over the weekend (Wow! Thank you all for visiting!) I'm offering up a little blog candy. All you have to do to enter is leave a comment, I'd love to hear what you'd like to see on the blog. On Sunday August 23rd I'll randomly select a winner from all the comments. Up for grabs is a selection of retired In Color textured cardstock, ribbon, and buttons. Good luck and thanks for looking!

 
Posted by Picasa

Feelin' Dusty!


Can you tell I love some Dusty Durango? Its funny, when the new In Colors came out I didn't immediately embrace them, and I certainly didn't see myself falling in love with Dusty Durango's burnt orange color. But once I saw them in person and began to "play" I find myself more and more turning to it. It is so rich and saturated. This card is super simple but elegant.

I began by stamping my image from Razzle Dazzle in Dusty Durango on Whisper White cardstock to make my background pattern. (You'll notice that I do this a lot!) I tied a Dusty Durango Polka Dot Grosgrain ribbon around the patterned piece and matted this on Dusty Durango cardstock and adhered it to my card base. (Hint: a standard card base is 5.5 by 4.25"; this is easily made by cutting an 8.5 by 11" piece of cardstock in half on the long side and folding in half. Your card made with these dimensions will then fit perfectly into an A2 envelope!)

My sentiment is from the Very Versatile set, from last Spring's Mini Catalog. I didn't realize it wasn't current until after I made the card, sorry! If I was to make it again I would probably use Teeny Tiny Wishes for my sentiment. I punched out the "Thank You" with the large Oval Punch and matted it on a Scallop Oval in, you guessed it, Dusty Durango! This was placed over my ribbon using Stampin' Dimensionals and I was finished. A super easy, super cute card!

Here's what I used:

Stamps
Razzle Dazzle 116714
Very Versatile (no longer available) I suggest using Teeny Tiny Wishes 115370

Ink
Dusty Durango 115654

Paper
Dusty Durango 115321
Whisper White 100730

Etc
Dusty Durango Polka Dot Grosgrain Ribbon 115609
Large Oval Punch 107305
Scallop Oval Punch 114889
Stampin' Dimensionals 104430
Posted by Picasa