Working on my Thank Yous!

I finally got back in the stamp room to start working on my Thank You cards. We have a blizzard Christmas Eve so I haven't exactly been eager to drive to the Post Office to mail my thank you cards but I figured with it being New Years I need to get them done!


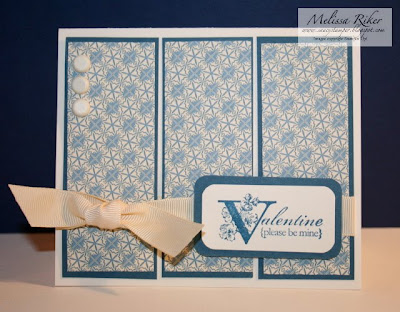
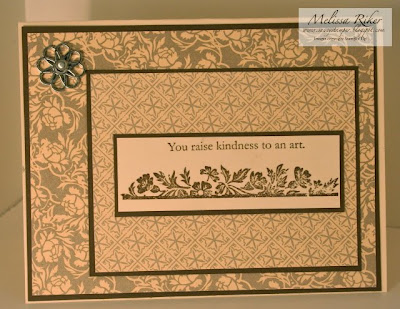
Here is one I made, I ued Bella Bleu Designer Series Paper and the large Filligree Brad. I matted on Soft Suede, which was a nice match for the Designer Paper for a soft look. The stamps are from the Vintage Vogue Stamp Set from the Occasions Mini Catalog available January 5th!

Speaking of the Occasions Mini, check out my Satin Ribbon Share...there are a limited number of spots left. To participate email me at melissa_riker at yahoo dot com. Each share is $20.50 and for that price you receive 3 yards each of all 9 NEW Satin Ribbon colors from the Mini Catalog. Payment MUST be received via Paypal by the 4th to participate. See this post for more info.

My New Year's Resolution

Hello all my Stamping Friends....

First of all I want to thank you all very much for visiting my blog! I started stamping in January of this year and joined Stampin' Up! as a Demonstrator in March. I began this blog in August and have loved so much sharing my creations and ideas with you all over the past 5 months.

You may or may not know that I am not a "business" demonstrator, although I would love to be. I have two young boys at home and a military hubby with a crazy schedule and it does not fit with my family right now to hold workshops and classes. I started this blog to share my passion for stamping "virtually" with you all!

I must admit though, that I have been having a hard time balancing the demands of life with my self-imposed demands of blogging so my New Year's Resolution this year is to RELAX! I will no longer be posting every single day on my blog, but rest assured I'm not going anywhere...I just need to take a little more time to enjoy the small things like reading books with my one year old or playing Candyland with my soon to be 3 year old.

I hope you all can understand and will continue to visit my blog. Happy New Years to you all!

Criss Cross Love....

How gorgeous is this new Sending Love Specialty Designer Series Paper? Love it!

This week's Late Night Stamper's Challenge is to use brads and I of course had to take the chance to use one of the new Real Red Epoxy Brads from the Occasions Mini Catalog out January 5th....along with this gorgeous paper!


For the Challenge I used a Criss Cross card, these are super easy to make and extremely cool looking...if you haven't made one you have to try one...contact me if you need instructions!


Does it feel like Valentines Day yet??? Only 47 days to go!

Don't forget to enter to win my Blog Candy in the post below-three winners will be drawn on January 3rd, and be sure to take advantage of my Satin Ribbon Share-get 3 yards each of all 9 new colors of Satin Ribbon...see this post for details!


Blog Candy!

To celebrate the New Year I'd like to give away a couple of my most popular tutorials as Blog Candy! To enter just leave a comment on this post and I will draw THREE WINNERS January 3rd!

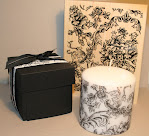
You will win my Bella Toile Candle and Gift Box Tutorial:

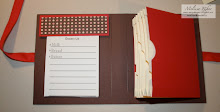
And my Scrapbook Wallet Tutorial:

Be sure to leave your email address in your comment so if you win I can send you the PDF files for the tutorials!

And don't forget to check out my Satin Ribbon Share-you can get 3 yards each of all 9 colors of Satin Ribbon from the NEW Occasions Mini Catalog out January 5th!

New Occasion Mini Satin Ribbon Share!!

Got Mini?

The new Occasions Mini Catalog will be available soon and as ou may already know, it will be offering 9 new colors of Satin Ribbon!!! If you're like me and want them all but don't want to spend $80+ to order full rolls then join my Satin Ribbon Share!!!

For $20.50 you will receive 3 yards of each of 9 colors: Chocolate Chip, Basic Gray, Certainly Celery, Very Vanilla Pretty in Pink, Real Red, Bashful Blue, Old Olive, and Basic Black! This INCLUDES shipping!

To join the share just email me at melissa_riker at yahoo dot com and let me know how many shares you would like. I will send you a Paypal invoice for your total cost. Shares begin shipping January 5th!

Merry Christmas!

I want to wish you all a very Merry Christmas. I'll be taking the next few days off to spend some much needed relaxation time with my husband and boys. I hope you all have a wonderful weekend full of all of the blessings of the season.

Best Wishes,

Melissa

Happy Bug-day!

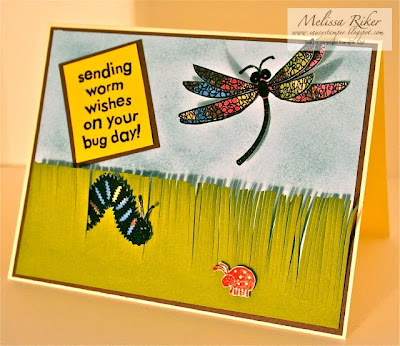
I had the idea for this card a few days ago but didn't have time to make it so I did a quick sketch and had to come back to it later...little did I realize how much work I had "cut" out for myself!

I began by stamping my dragonfly twice and my caterpillar once onto Tall Tales Designer Series Paper in Versamark Ink. I then heat embossed using Black Stampin' Emboss Powder and my Heat Tool. I also stamped my ladybug in Ruby Red on Whisper White and dabbed the entire scrap of paper on my Versamark pad and embossed with Clear Stampin' Emboss Powder. Then came the work-snipping out all of these little creatures with my Paper Snips! (Paper Snips are a must-have for any kind of detailed cutting, they make a HUGE difference!!)


On the second Dragonfly I cut out, I only cut out the wings and center body section. I took a piece of 5 1/4 by 4" Bashful Blue Card stock and sponged over it with Bordering Blue. Then I took a scrap of Old Olive and fringed one side of it with my Paper Snips to make a tall grass effect. This was adhered to the bottom of my Blue card stock to create my "scene."

I adhered the full dragonfly in the top right corner of the paper and then applied the second wing set over top. My caterpillar was nestled in the middle of the grass and the ladybug balances it all out, perching on her Stampin' Dimensional!


The sentiment was heat embossed with Versamark and Black Stampin' Emboss Powder on So Saffron card stock and matted on Chocolate Chip. The entire card was then matted on Chocolate Chip and adhered to a Very Vanilla Card base. You have to let me know, was it worth the effort? What do you think?

Scrapbook Album and New Tutorial!

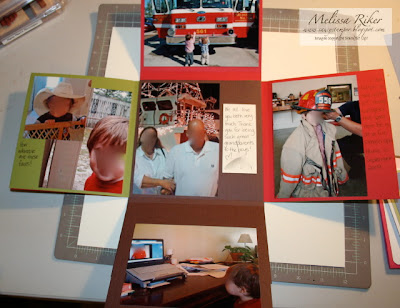
I made this lovely Scrapbook Wallet as a present for my husband...I'm still waiting for the pictures to go in it to arrive (hopefully asap as Christmas is just days away!) but I thought I would go ahead and share it with you and per numerous requests, I have a tutorial for this album now available.


The tutorial is a 14 page PDF file with 25 pictures and includes step-by-step instructions and measurements for this album as well as examples of alternate color/decorations options. It is only $5 and can be purchased by clicking on the "Buy it Now" button below. Please allow up to 24 hours to receive your PDF file via email as it is sent manually (I am usually very fast at sending them once I receive your payment.) This is an easy, fast, and impressive last minute Christmas present! You can see another example of this album with a Christmas Theme here.


Vintage Inspiration

First of all, let me apologize for my photography...I am having issues with making my pictures appear right...they're always too dark or too light and I hesitate to adjust the values on my computer too much because then the colors don't come across true....anyways, long story short I need to photograph in natural light, I know, I know....my lair of a craft room is in the basement!

So here is a card I made inspired by my good Design Team friend from Late Night Stampers Carole'Anne. She has some great stuff on her blog here.


My card base is Soft Suede. The background was made by stamping my flower pattern from Vintage Vogue in Versamark on Very Vanilla and embossing with Clear Stampin' Emboss Powder. I then rubbed the paper with a sponge and Soft Suede ink and wiped the embossed areas with a paper towel to rub the ink off of them. I got this from Carole'Anne and really love the way it turned out. I then tied a Whisper White Satin Ribbon around it.

My Flower was made my stamping the flower from Vintage Vogue in Old Olive Craft Ink Twice on Very Vanilla and embossed again with Stampin' Emboss Powder. I then snipped them out with my Paper Snips and fastne them together with a Very Vanilla Jumbo Brad. I folded and curved the petals a bit for a more three dimensional look. I dabbed some White Shimmer Paint on the top of the Brad. Although its hard to see I attempted to make some "faux" pearls in the upper left corner using Shimmer Paint and Crystal Effects (another idea from Carole'Anne!)

Thanks for looking!

Embrace Life

I made this card a bit ago and somehow forgot to post it. I used the Embrace Life and Vintage Vogue stamp sets.


My card base is Whisper White scored on the side. On this I layered Textured Old Olive cardstock, Basic Black, and Pale Plum. I stamped the flower images in Pale Plum and Old Olive Craft Ink and embossed with Clear Stampin' Emboss Powder. The sentiment is from the same stamp set stamped in Jet Black Stazon and matted on Basic Black. A Mini Library Clip attaches it to the side of the card.

This card is much more striking in person, I'll have to work on my photography skills! I hope you like it and are having a great weekend!

Look Who's 3!!

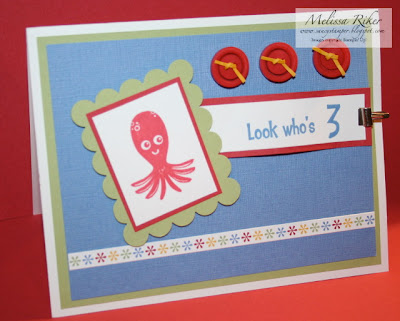
One of my older son's friends turned 3 today and this is the card I made for him using the Look Who's Turning set and Happy B-day Simply Scrappin Kit:


My card base is Whisper White scored at the top followed by layers of Certainly Celery and Brocade Blue. I used one of the borders from the Happy B=Day Simply Scrappin' Kit allong the bottom edge of the card. The sentiment from Look Who's Turning was stamped in Brocade Blue on Whisper White and matted on Ruby Red. A Stampin' Up Mini Library Clip attaches my banner to the right side of the card. (I subtly curved the banner for a more 3 dimensional effect.)


I stamped my Octopus from Look Who's Turning in Ruby Red on Whisper White and matted on Ruby Red and Certainly Celery punched with the Scallop Edge Punch. I adhered this over the end of the banner with Stampin' Dimensionals. To finish off the card I added three Real Red Buttons from the Playground Designer Buttons Pack. (I "threaded" my buttons with slivers of Crushed Curry Cardstock and adhered them with Mini Glue Dots-a must for getting embellishments to really "stick.")

Thanks for bearing with me the past week, between my Dad's illness and my emergency trip and then coming home and getting a stomach flu, I've been absent from the stampin' room...but I'm back now!

Nontraditional Christmas Card

Thank you for your patience with my blog while I was out of town. My Dad has a long road ahead of him but he seems to have taken a turn for the better and know we'll just continue to pray that he keeps making progress. Thank you for the kind wishes and all the prayers.

On to stamping....here is a Christmas card I made today, my first project back in my stamping room...I had taken a few stamping supplies with me and managed to make some cute one layer cards for my Dad, family members, and his nursing staff in the ICU, but I'll share those at a later date. This card is simple but has some pretty neat little touches to it that I think help make it special.


My card base is Very Vanilla scored at the top, followed by a layer of Old Olive. Another piece of Kraft cardstock was crumpled tightly then flattened back out and adhered over the Old Olive to add texture to the card. My sentiment from Many Merry Messages was stamped in Old Olive Ink on Very Vanilla. The edges were given a distressed look with my Soft Suede Stampin' Pad and a sponge. The Ribbon is actually the Rich Razzleberry Polka Dot Grosgrain Ribbon, just turned to the plain side. I used SNAIL adhesive to form my bow and then used a bit of hemp twine as an accent.

I'd love to know what you think of this card...its a bit untraditional for a Christmas card but I love the way it turned out.

Happy Wednesday everyone, its good to be back home!

PPA Lovely as a Tree

Last week I posted about my father being in the hospital after a surgery and it seems he has had some serious complications that have landed him in Intensive Care. I will be out of town Saturday through Tuesday to be with him. I have scheduled my blog to continue to post while I am gone but I hope you understand I do not have time to give details about my cards right now. I will have access to email while I am gone so please feel free to ask any questions if you have them. Thank you for your understanding.

Vintage Vogue meets I {heart} Hearts

Last week I posted about my father being in the hospital after a surgery and it seems he has had some serious complications that have landed him in Intensive Care. I will be out of town Saturday through Tuesday to be with him. I have scheduled my blog to continue to post while I am gone but I hope you understand I do not have time to give details about my cards right now. I will have access to email while I am gone so please feel free to ask any questions if you have them. Thank you for your understanding.

I {heart} Hearts meets Christmas Cocoa

Last week I posted about my father being in the hospital after a surgery and it seems he has had some serious complications that have landed him in Intensive Care. I will be out of town Saturday through Tuesday to be with him. I have scheduled my blog to continue to post while I am gone but I hope you understand I do not have time to give details about my cards right now. I will have access to email while I am gone so please feel free to ask any questions if you have them. Thank you for your understanding.

Family Emergency

Last week I posted about my father being in the hospital after a surgery and it seems he has had some serious complications that have landed him in Intensive Care. I will be out of town Saturday through Tuesday to be with him. I have scheduled my blog to continue to post while I am gone but I hope you understand I do not have time to give details about my cards right now. I will have access to email while I am gone so please feel free to ask any questions if you have them. Thank you for your understanding.

Here and There....

Many of you already know that I am on the Board of Directors of a nonprofit organization called Still Someone. We donate handmade lap blankets and cards to seniors living in care facilities. This past month I reached out to my fellow stampers via the Late Night Stampers yahoo group and also we were featured on Splitcoast Stampers and Compassionate Cards as the Cause of the Month last month.

I'm very proud to say that due to some unbelievable generosity I have over 1200 cards sitting in my craft area (much to the dismay of my very organized and orderly husband!!)

I have been frantically sorting out all of the Christmas and Holiday/Winter themed cards so that they can get delivered next week...I've also signed about 100 so far with many more waiting to be signed! I haven't done a final count of holiday cards but I know 230 are going to the Eisenhower VA Medical Center here in Leavenworth and another 175+ will be going to a nursing home in Charleston, SC. I'm sure we'll have more than that so once I have the final count I'll find a third recipient facility. (If you are interested in delivering cards for us please contact me at melissariker at yahoo dot com...we deliver year round so we always need help!) Here is a picture of one of the boxes I received yesterday from Compassionate Cards!!!


On one of my breaks from sorting and signing I managed to put up some Decor Elements in my craft area. I have had the Tree one since I signed up as a Demonstrator in March but hadn't put it up because I knew we'd be moving over the summer...then as we settled into our new home my craft area moved around 3 times but I'm confident I'm settled now so I went ahead and put it up. I also put up the quote that I received FREE as part of the Holiday Extravaganza promotion! I thought this quote in particular was perfect for me as the mom of two toddlers! Visit my online store to make a purchase and get your own free Decor Element!


And just in case you thought I wasn't going to share a project, I made this to share, a Calendar for my craft room inspiration Board.


I used a Chipboard coaster as my base and covered it with the new Sending Love Designer Series Paper. I tied a Pretty in Pink 1/4" Grosgrain Ribbon around it and added a Real Red Epoxy Brad (new in the Occasions Mini!) to finish it off! It has magnetic strip on the back so I can hang it above my work area. What do you think?
Lovely as a Tree

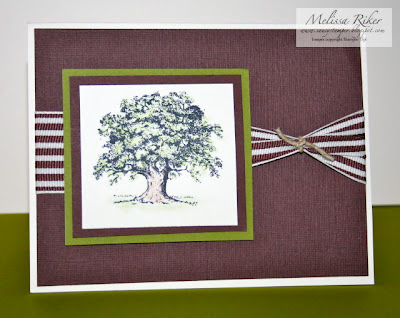
How "lovely" is the Lovely as a Tree set? Its so versatile! Check out these two cards I made quickly and easily:

I love this Clean and Simple card...it is a Whisper White card base scored at the top. I stamped my Seasons Greetings from Many Merry Messages in Jet Black Stazon. My tree was stamped in Old Olive Craft Ink and heat embossed with Clear Stampin' Emboss Powder. It was then matted on Basic Black and adhered to my card over an Old Olive 5/8" Grosgrain Ribbon! Voila! Finished!


This second card is an all-occasion masculine card.


My card base is Very Vanilla scored at the top and layered with textured Chocolate Chip cardstock. My tree was stamped in Jet Black Stazon on Very Vanilla and then colored using my pastels. It was matted on Old Olive cardstock and adhered over a Chcolate Chip Striped Grosgrain ribbon, tied with Hemp Twine.


Another Vintage Vogue Share!

I just love my the new Vintage Vogue set out of the upcoming Occassions Mini Catalog (available January 5th). It lends such a "shabby chic" feel to cards like this one I'd like to share today:


I made this card starting with a Very Vanilla Card Base scored at the top. Over this I layered textured Old Olive cardstock. My flowers and leaves were stamped in Rich Razzleberry, Cameo Coral, and Old Olive and matted on Chocolate Chip Cardstock. A Rub-on from the new Chat Room Rubons in the Mini and two super cute new Chocolate Chip Epoxy brads finish it off perfectly!

I know I've been on a "Sneak Peek" roll here, but I did realize I'm a few Christmas Cards short the other night so I promise we'll be back to Christmas tomorrow! I've got another video tutorial in the works too! I'd love to hear your thoughts on the upcoming Mini, so leave a comment!


New Clear Mount Stamps


I'm so excited that starting January 5th I'll be able to offer you another option for your stamping needs, Clear Mount Stamps. I have received these in my pre-order and am loving them! Please note that the stamps themselves are still the same high quality rubber you know and love but now have a Clear Mount option. Here are a few features of Stampin' Up's Clear-mount stamps:


Clear-Mount Rubber Stamp Features
  • Nine different sizes of clear blocks available individually or as a discounted bundle.
  • Blocks have ergonomic grooves on all four sides for easy grip and traditional wood-mount feel.
  • Stamps and blocks are durable and easy to clean with your Stampin' Scrub and Stampin' Mist.
  • Optional image labels on stamp backs let you decide if you want to see the image through the block or not.
  • Tight die-cutting for easy image positioning.
  • Large clear blocks can be used to create collages or spell words with alphabet sets.
  • Stamps store easily in standard, DVD-type cases with artwork on front and spine, making organization easy.

More Sneak Peeks!!

How about a few more Sneak Peeks from the Stampin' Up! Occasions Mini Catalog, out January 5th??

I made this card using the Vintage Vogue Stamp Set. I stamped my flowers in Chocolate Chip, Ruby Red, and Old Olive on Very Vanilla Cardstock. The images were then matted on Chocolate Chip and layered on Swiss Dot embossed Old Olive Cardstock I had run through my Big Shot. My card base was Very Vanilla as well. My sentiment, also from Vintage Vogue, was stamped in Chocolate Chip on Very Vanilla, matted on Chocolate Chip and attached with a Mini Library Clip.


I am in Love with this next card! It features the I {heart} Hearts stamp set and the Sending Love Specialty Designer Series Paper! I LOVE this paper! Its glittery and fantastic! You can't see much in the picture but my little hearts were punched out of Real Red cardstock and adhered with slivers of Stampin' Dimensionals. The sentiment is from Vintage Vogue.

Seriously, this card makes me so happy!!


I'd love to hear your thoughts about my cards and about the new products coming out in the Occasions Mini catalog!

Sneak Peek Time!!!

My goodness, the UPS man showed up a day earlier than I expected with all my preorder goodies! I jsut had to show you my first project with some of the products from the upcoming Occasions Mini Catalog!

The sentiment is from the Vintage Vogue Stamp Set and the Heart is from I {Heart} Hearts set!

Lovely as a Tree

I recently received the Lovely as a Tree stamp set, and let me tell you, I don't know how I ever got along without it...this set is truly a classic among the Stampin' Up! collection and definitely seems to be the "go-to" set for masculine cards! Here is a card that was so easy to make but turn out truly elegant due to the perfection of this stamp set:


I got inspiration for this card from a card my upline Lisa Freeman recently made using another stamp set. I stamped my treeline image from Lovely as a Tree and sentiment from Many Merry Messages onto Whisper White cardstock using Jet Black Stazon. I then sponged various blues overtop of the image to give a nice winter day feel. (I don't use sponging on my cards often but its an easy technique that makes some very cool effects and worth trying if you haven't!)

I then layered my image onto coordinating blue cardstock (you can really play with all the blues Stampin' Up! has to offer with a card like this...I used various blues from the Rich Regals Color Family.) and matted on a Whisper White Cardbase. Too easy!

The sponging really creates a scene in this card and take it from boring to beautiful! Leave me a comment and let me know what your favorite technique is for adding that special something to your cards!

A Masculine Valentines Card

Here's another Valentine's card for the Late Night Stamper's Challenge. This one is more masculine-I'll be giving it to my hubby come February (unless he gets sneaky and decides to peek at my blog!)


I just received my first package of Bella Bleu Designer Series Paper and, man is it gorgeous! I just don't think you can go wrong with this pattern-so elegant! My sentiment is from the Holiday Best Hostess Level 1 set, and the style coordinate perfectly with the Designer Paper.

I hope you all are having a good weekend, I'm still anxiously awaiting my Demonstrator PreOrder so I can show you all the new goodies Stampin' Up! has in store for you this Spring! Want to get your hands on the goodies early too? Want them for up to 40% off?? Click here and hit the "Join Now" button to sign up as a demonstrator! My password is "saucystamper."

Christmas Scrapbook Wallet

I'm so excited to share this scrapbook wallet I made for my Dad and Stepmom. We were planning a visit with them this Christmas but our plans were changed and we won't be able to see them and haven't had a visit since the summer. I thought this was a nice way to send lots of pictures! (Please forgive the blurred pictures, for personal reasons I prefer not to post my family's pictures on the internet.)


The Outside


The First Layer when Opened:


The Second Layer of Photos:


The Third Layer:


The Inside of the Album:


I hope you like my Scrapbook Wallet! I love the way it turned out!

I'm dotty for you!

This week's Late Night Stamper's Challenge is "Hugs and Kisses," or all things Valentines!! I took advantage of Stampin' Up's Online Extravaganza last week, did you? I got the Heart to Heart Punch and Chipboard Letters Bundle at a huge discount and used my new goodies to make this card:


I started my card with a Whisper White cardbase scored at the top. Textured Old Olive Cardstock was layered on this. My chipboard letters were covered in Cottage Wall Designer Series Paper and my heart was punched out of Pretty in Pink textured cardstock. These were positioned on Rich Razzleberry cardstock and matted on layers of more Cottage Wall Designer Series Paper and Rich Razzleberry cardstock. A Rich Razzleberry Polka Dot Grosgrain Ribbon finishes it off and add the last needed "punch" of dots!


I love the way this card turned out-so fun! At least I have 2 months to figure out who to send it to! Why don't you join us at Late Night Stampers so you can play the challenges too?